osxdailynews.blogspot.com ®
Create a Password Protected Text File with vi and the Command Line It’s easy to create a password protected text file by using the command line text editor ‘vi’. This is infinitely useful for privacy purposes, whether the protected file is for containing login details, various passwords, personal information, a private journal, or just about anything else that you want stored securely in a single password protected text file.
Vi is considered a bit advanced and has a fairly steep learning curve, but it is very powerful. Fortunately, if you’re looking to just encrypt a text document though, vi can be reasonably simple enough and we’ll cover some basic vi/vim commands to get you started with it for this purpose.
Do note that for the average skilled user, and for those who aren’t fans of the command line, using the more traditional security options of full disk encryption with FileVault, or the method of adding files and folders into an encrypted image can be easier because it is handled entirely through the graphical interface and file system of Mac OS X. Those two methods also let you use a more familiar app like TextEdit (or anything else for that matter) to edit the documents stored behind the password layer. Just remember to save and quit the file and then eject the virtual disk if you go the route of a disk image, and to log out of the Mac when not in use if you try Filevault, or else you will miss those layers of password protection. Of course those two methods will limit the files readability to a Mac, so if you desire to have some cross-platform access to the file in question, than this vi trick works well as it remains accessible from Linux and other unix flavors with vi or vim. So, want to go the command line route? Then onward with encrypting text files with vi!
Creating the Password Protected Text File
Creating the file is simple enough, launch Terminal (/Applications/Utilities/ but you should know that by now if you’re comfortable with the command line) and use the following command syntax:
vi -x protectedtext
When requested by vi, enter a password twice open vi with the encrypted text document. As usual with encrypted files, do not forget that password, or you won’t be able to open the file again.
So now you’re in vi. If you’re familiar with VI and VIM you won’t need any assistance obviously, but vi/vim can be a huge confusing headache for newcomers to the advanced text editor. Without going into a huge vi tutorial, we’ll focus on just a few very simple vi commands that let you move around the document, insert text, save, quit, and both simultaneously quit and save the encrypted text file.
Simple vi Commands
- i to insert text
- Control+F to scroll forward a screen
- Control+B to scroll back a screen
- /(search phrase) + RETURN to search the file for “search phrase”
- ESCAPE to enter vi commands, to be able to quit, save and quit, etc
- ESCAPE + ZZ to save and quit vi
- ESCAPE + :q! to quit without saving
- ESCAPE + :w + RETURN to save without quitting
Yes, these are case sensitive. For example, to exit and save, ZZ must be in caps, making the save and exit command more like Shift+ZZ.
We’re intentionally keeping it simple here, but if you’re looking for an in-depth vi tutorial, here’s a great one from a leading engineering university.
For a practical example, here is what you’d do to create the encrypted document with a password, enter some text, and then save and exit. We’ll highlight key commands with [brackets] to indicate when to press a key:
vi -x encrypted_text_file

[i key]

(type some stuff you want to be in the encrypted file, pretend you are now finished and want to quit and save)

[ESCAPE key]

ZZ
You’ll now be back at the command line. To go back to the document you can just open it as usual with vi:
vi encrypted_text_File
You’ll then need to enter the password to access the contents.
All of this may seem a little foreign to those unaccustomed to vi/vim, but you’ll quickly get the hang of it.
Important: the protected file will only be accessible through vi/vim
This file and its contents will now only be accessible through vi/vim, trying to open it with another application or command line tool will result in nothing but gibberish showing up, preceded with a “VimCrypt” message, looking something like this:
VimCrypt~01!}???+?)??j2???^1Z??u4@???.t?????gҸ}? ų??5p??#?]?M?ז???7?a???4?N7A????7??"??잏?0??+?1Z??q?7N?|?uͫ?||?
You can also opt to simply create a normal text file with a text editor of choice, zip it with a password, then unzip it to modify or use the document, and then rezip it with the same password, but it would be hard to argue that is any easier than the aforementioned trick, though one advantage to the zip approach is cross-platform compatibility, and the ability to modify the contained documents through any application.
Thanks to Chris for the tip inspiration
Email this
Create a Password Protected Text File with vi and the Command Line to a Friend! Receive Articles like this one direct to your email box! Subscribe for free today!


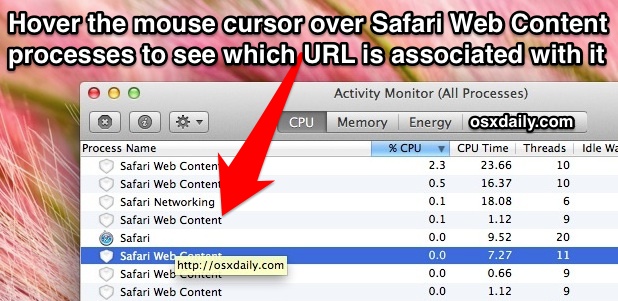
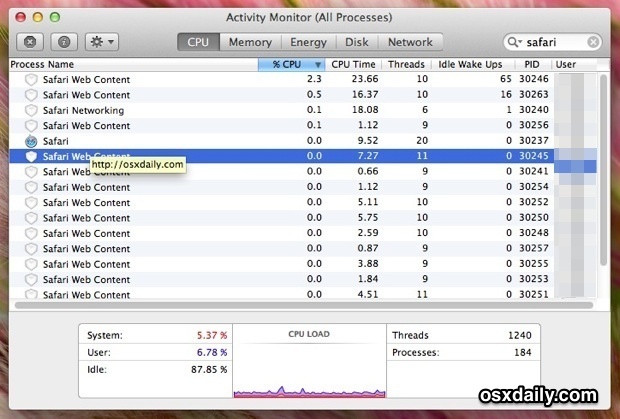
 FileVault is a security feature that offers full disk encryption for Macs. Identifying Macs that are using FileVault is fairly easy in person for machines that have a logged in user account, all you have to do is check System Preferences to see if has been enabled or not. But what if you the Mac is either not logged into a user account, or what if you need to identify Filevault usage remotely? Both of these situations can call for using the command line to figure out the status of disk encryption.


 All portable Macs in the MacBook Pro and Air lineup have backlit keyboards these days, which not only makes it easier to type in dim lighting, but let’s face it, it also looks really fancy too. Because the backlighting uses very low power LED to illuminate, there isn’t much of any hit to battery life if the brightness is set at a reasonable or low level, so many people choose to have the backlit keyboard showing all the time, even if lighting situation doesn’t call for it to be useful. But sometimes the backlit keyboard doesn’t work at all for seemingly no apparent reason… and even attempting to manually control the backlighting with the keyboard shortcuts suggests the feature isn’t working or is disabled. There’s a few possible reasons for the backlighting to stop working, with most offering simple resolutions.