
OS X Mavericks is an excellent update for Mac users that has tons of great features, but even though the free update is aimed at power users with many advanced behind-the-scenes improvements, that doesn’t mean that all the tricks are complex. In fact, some of the best features new to Mavericks are some of the easiest to use, and we’re going to cover six of the absolute best simple tips you can start using right now.
1: Open New Finder Tabs with Command+T
If you are one of those users who winds up with tons and tons of Finder windows open, you’re going to love Finder Tabs, which lets you have a single Finder window to hold them all:
- From any Finder window, hit Command+T to create a new tab, or click the [+] icon
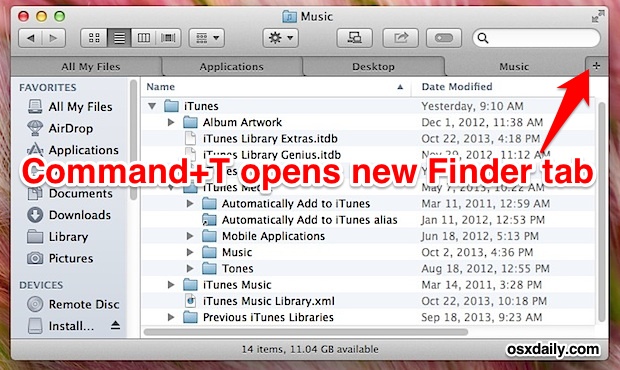
Finder Tabs work just like tabs in a web browser, and you can have each tab opened for a different location on the Mac file system, with full drag & drop support between them.
2: Quickly See What Apps Are Draining Battery
Portable Mac users will love this one, because now the Battery menu bar in OS X will tell you which apps are using significant energy.
- When on battery power, pull down the battery menu and look under “Apps Using Significant Energy”
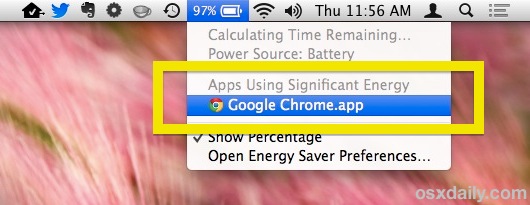
You’ll then want to take action accordingly, either by quitting the app, finishing the process, closing the browser tab that’s hogging resources, or whatever else.
This is basically a super user friendly method of seeing what’s using excessive system resources without turning to Activity Monitor, and if an app is listed in this menu, it’s likely negatively impacting your battery life.
3: Rely on App Nap to Save Battery Life & Energy Use
Apps that are left inactive in OS X Mavericks will automatically suspend themselves, dramatically reducing their system resources usage and energy consumption. This is all handled intelligently behind the scenes with a great feature called App Nap, and using it is so simple: just let a background app go unused for a moment, and App Nap will kick in to pause that app process until it becomes active again. The result is much improved battery life, and between this and the aforementioned menu bar trick, you can largely say goodbye to those background apps sapping your battery life.

For those who are curious how this works, it’s actually pretty similar to the advanced command line kill -STOP trick we showed you, except there is no user involvement necessary, and obviously no Terminal use. A similar feature, but App Nap is entirely automated and very user friendly, regulating any power-hungry application usage, whether it’s CPU (processor) usage, network activity, and even disk reads and writes.
4: Reschedule App Update Reminders
You can now reschedule App Update reminders and Notification Alerts directly from the alert dialog itself – yes, that means no more swiping away that same notification every 15 minutes!
- When the “Updates Available” alert pops up, click on “Later”
- Choose one of three delay options: “Try in an Hour”, “Try Tonight”, “Remind Me Tomorrow”
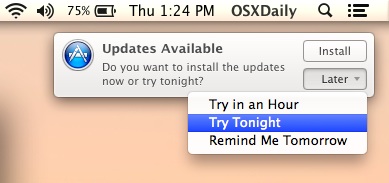
This is a huge relief to those annoyed with the pestering software update alerts and their frequent nagging in prior versions of OS X.
Of course, you can always just choose to “Install” the update too, but in the middle of the work day that’s usually an inconvenience, which leads us to the next great trick.
5: Set Apps to Automatically Update, Or Not
You can now set your Mac apps to automatically update themselves in the background. This completely prevents visits to the App Store Updates section to self-install, and it can be customized to automatically handle either individual apps or system and security updates, or both.
- Open System Preferences from the Apple menu, and go to “App Store” settings
- Toggle the box for “Automatically check for updates”
- Selectively toggle the other options according to your individual preferences:
- “Download newly available updates in the background” – fairly self explanatory, but with this turned on the updates will download themselves and then prompt you to install them, unless the next option is enabled which it will then automatically install too
- “Install App Updates” – combined with the prior setting, this will both download and install app updates as they become available, entirely automated and behind the scenes
- “Install system data files and security updates” – Highly recommended to leave this enabled and turned on, even if you don’t want your apps auto-installed, security updates are a very good idea to automatically install
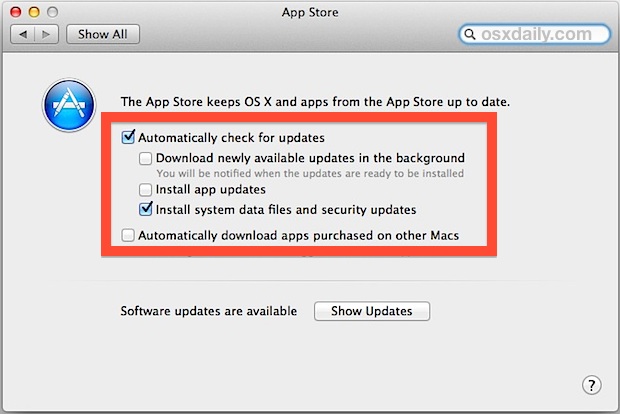
For those of us who keep our Macs turned on all the time and basically never shut down or sleep, this is a particularly great feature, because it takes away some of the more tedious work required with updating your apps and making sure everything is up to date.
On a side note, this feature also exists in the iOS mobile world from the 7.0 update and onward, but it makes much mores sense on the desktop where users are typically connected to wi-fi, whereas in the mobile world it can cause inappropriate cellular data usage and battery drain. Thus, for iPhone and iPad users, we recommend keeping this feature off as a means of saving battery, but on the Mac it makes more sense to leave turned on.
6: Add Tags to Documents When Saving
Finder Tags are basically Finder Labels with a new name and much better system integration, and the ability to add these tags to documents when saving is a huge perk that makes it an excellent new inclusion with OS X Mavericks. Using tags when saving files is one of the best ways to get started using them:
- When saving a document as usual, under the filename section, click into the “Tags” portion and enter your tags – aim for topical and descriptive tags
- Save as usual
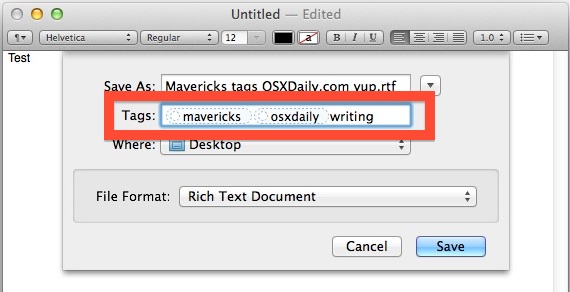
Using descriptive topics as tags is a great way to go, and things like class names, work, project names, recipes, taxes, banking, just select tags that define the documents topic, you get the idea.
You can then retrieve all files using those tags in the Finder using the sidebar or with Finder search. No sorting or gathering with folders is necessary.
Email this 6 of the Best Simple Tips for OS X Mavericks to a Friend! Receive Articles like this one direct to your email box! Subscribe for free today!

Tidak ada komentar:
Posting Komentar