
![]() Many urbanites and city dwellers get about by walking, the oldest form of transportation in existence. If you’re one of us who often gets about a concrete jungle by propelling your legs in a forwardly direction, you’ll be pleased to know that the popular mapping applications in iOS have you covered. Both the default Maps app from Apple and Google Maps offer walking directions, though using each is slightly different.
Many urbanites and city dwellers get about by walking, the oldest form of transportation in existence. If you’re one of us who often gets about a concrete jungle by propelling your legs in a forwardly direction, you’ll be pleased to know that the popular mapping applications in iOS have you covered. Both the default Maps app from Apple and Google Maps offer walking directions, though using each is slightly different.
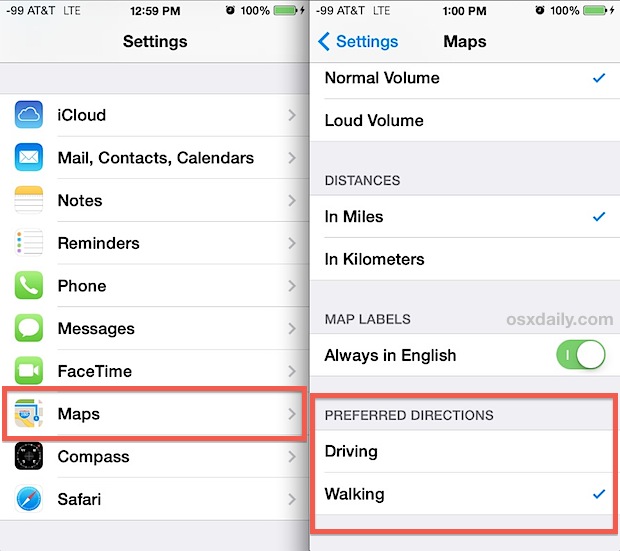
Set Walking Directions as Default in Apple Maps for iOS
Notice this is “set” walking directions, because with Apple Maps you can set the default direction choice to be walking, which is excellent if you spend most of your time in a walkable downtown region.
- Open the “Settings” app and choose “Maps”
- Scroll down to “Preferred Directions” and tap on “Walking” to set foot traffic as your new default preference
- Exit out of Settings and go back to the Maps app for changes to take effect
Directions will now be provided with a preference by foot travel, and it’s usually pretty good, providing sidewalk shortcuts and foot/bike overpasses when possible. For the most part, this is really best for a city, and it’s a largely fruitless endeavor beyond the obvious for smaller towns, which often set the walking directions as the same as driving directions.
This can also be useful to toggle on for those visiting a downtown region for the day, say if you have a car parked in a garage and have spent the day walking around, since it can make the pin drop find-your-car trick more appropriate for getting back to the car by foot.
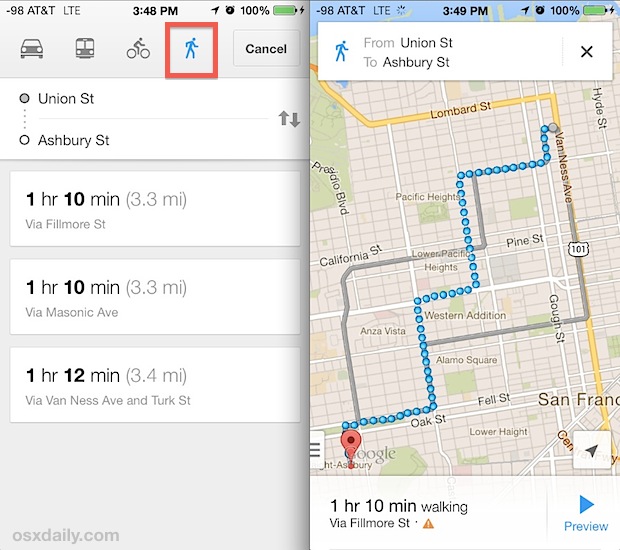
Get Walking Directions in Google Maps for iOS
Google Maps handles walking directions a bit different than Apple Maps, with no general default setting other than what you last used. This means if you last looked for driving directions, that will be your default, or if you last used walking, then foot travel would be the default. Anyway, using Google for walking directions is super simple:
- Open Google Maps and search for a destination, or tap and hold to drop a pin
- Tap the walking guy icon at the top of the screen to toggle walking directions on
- Now tap the desired route from the list to draw walking directions on the map
Google Maps seems to have more walking data than Apple Maps, and you’ll sometimes get slightly different and often better walking directions for some locations, particularly smaller cities. Google also lets you drop a destination into the middle of nowhere, meaning no where near a road at all, and it will try it’s best to give you walking directions to get there – which can mean travel through parks, trails, walkways, and other corridors that may be otherwise not quite obvious.
Even for driving I generally recommend having both Google Maps and Apple Maps installed on iPhones, since adding Google Maps doesn’t take up much space, and, let’s face it, it’s still more accurate for many places anyway. The accuracy gap is shrinking, but urban folks will still often be better served by Google Maps, and thus it really does deserve a place on the iPhone of anyone who plans on spending a lot of time walking about in a city, even if it’s just for vacation. Another helpful trick is to remember that many city streets are laid out on a grid, sometimes in obvious north/south/east/west fashion, which can makes reorienting the maps to be pointing north particularly helpful when walking around.
Email this Get Walking Directions in Maps for iPhone to a Friend! Receive Articles like this one direct to your email box! Subscribe for free today!
Tidak ada komentar:
Posting Komentar