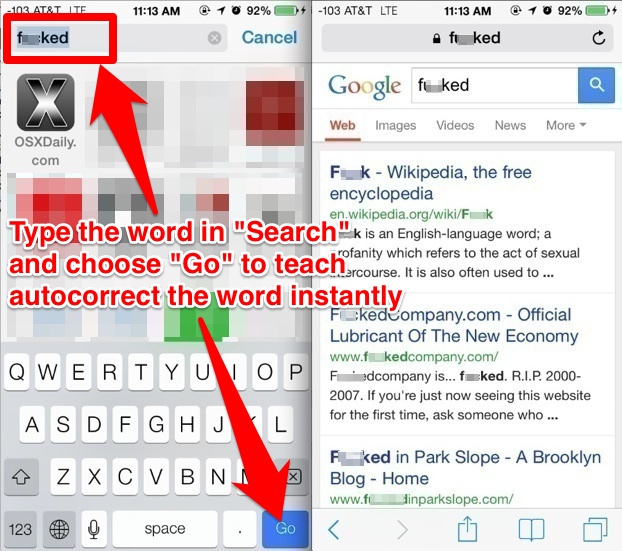
 Mail app on the iPhone and iPad received a major revamp along with iOS 7 that includes a variety of improvements and adjustments, but out of all the new features, some of the simplest changes are perhaps the most welcome. Case in point; a new and much faster way to easily mark all emails in Mail app as read. Yes, you read that right, you can now almost instantly mark all email as read on the iPhone, without having to use any quirky tricks or workarounds to complete the task. Amazingly, this simple option took until iOS 7.0 for users to get, but now the process is very direct and extremely quick:
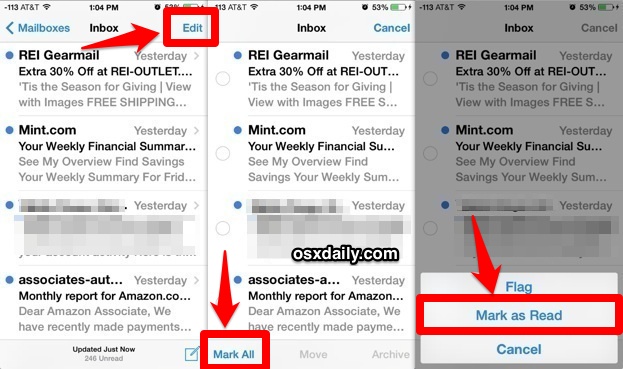
- Open Mail app, and go to an inbox where you have multiple emails that are set as unread
- Tap on the “Edit” button in the corner
- Now tap on the “Mark All” text (at the bottom on the iPhone)
- Choose “Mark as Read” to instantly mark all mail as read
For the best results when trying to mark all as read in a huge inbox, be sure to scroll down a ways so that more messages load. Stragglers that are not loaded within Mail app or within the scrollable region won’t necessarily get marked as read, though part of that seems to depend on the individual email service that users have configured with Mail app.
The status effect is immediate, and all mail messages will lose the little blue dot next to them which is used to indicate an unread email. This really helps to quickly clear out a busy inbox, or just to cut down on the red notification badges that sit on the Mail icon if you don’t like them lingering around on the home screen.
As you’ll likely notice when tapping on “Mark All”, above the mark all as read option is a “Flag” choice for those who use flagging. Also, this process can be done the other direction too, and used to mark all emails as ‘unread‘ if that is desired as well. Between the three new bulk management options, it is now much easier than ever to manage enormous inboxes or just to declare inbox bankruptcy, mark everything as read (or spam if you hate your email senders), and start over from scratch again with inbox zero.
Sure this seems like such an incredibly simple feature, but it is actually a huge improvement from the behavior of marking bulk email as read in prior versions of iOS. Users who have not yet updated to iOS 7.0 will have to use the older methods of individual email selection, which really emphasizes how superior the new ‘mark all as read’ option is compared to the old trick that required individually marking selected mail messages as read by manually selecting multiple threads, to achieve a roundabout ‘mark all’ result. It’s worth mentioning that old per-email message trick does continue to work in new versions of Mail app for iOS though, so if you need to just mark a smaller group of mail as read rather than everything, you can still do so by manually selecting them.
Like this email trick? Don’t miss 10 pro tips for smarter usage of iOS Mail.
Email this How to Instantly Mark All Email As Read in Mail for iOS to a Friend! Receive Articles like this one direct to your email box! Subscribe for free today!