Warung Online

Senin, 06 Januari 2014

Delete Voicemails from the iPhone One at a Time or Multiple at Once osxdailynews.blogspot.com

Written By Unknown; About: Delete Voicemails from the iPhone One at a Time or Multiple at Once osxdailynews.blogspot.com on Senin, 06 Januari 2014

osxdailynews.blogspot.com ® Delete Voicemails from the iPhone One at a Time or Multiple at Once

Phone icon If your iPhone voicemail box gets hit up constantly and you actually listen to the messages, each voicemail message gets downloaded locally to the iPhone and takes up some storage space. For most users, this is usually an inconsequential amount of data ranging from 5MB-100MB, but for those who send a lot of calls directly to voicemail and have tons of locally stored messages, or whose message leavers dump a 15 minutes rant onto your voicemail, you may find the size to become a nuisance. Fortunately, it’s easy to clear out voicemail from the iPhone either with a single message or with multiple at a time, so whether you just want to declutter the iPhone a bit, lose that lengthy weirdo message someone left on your phone, or simply restore some additional storage capacity, you’ll find it just takes a moment or two to complete.


Quickly Delete a Voicemail Message on the iPhone


  1. Open the Phone app on the iPhone and tap on the “Voicemail” tab

  2. Swipe left across the voicemail message to summon the red “Delete” button when it appears, then tap on that to delete the message


Swipe to delete Voicemail messages on the iPhone


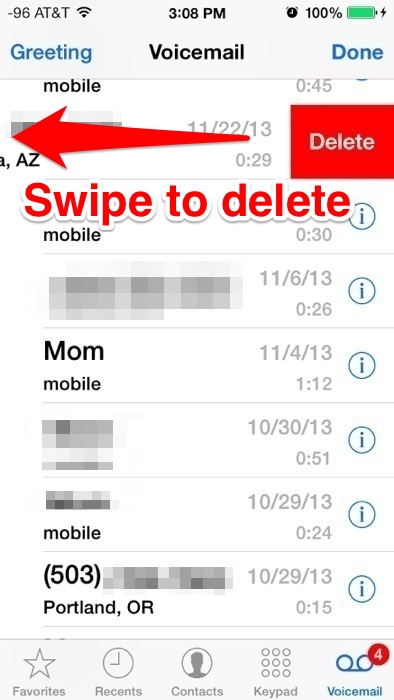
You can also choose the “Delete” option after you have listened to a message, though that isn’t as fast.


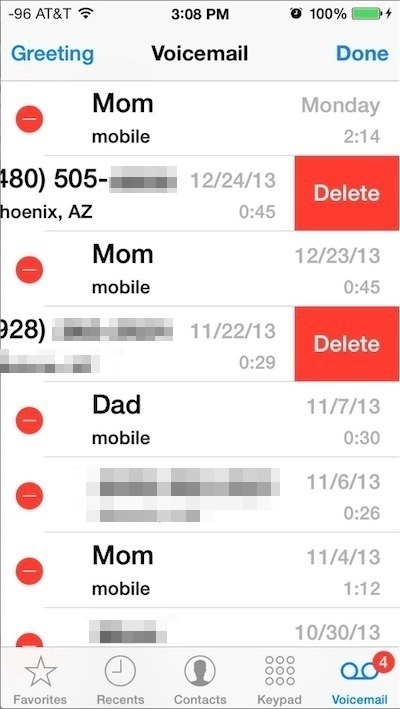
Optionally, you can use a little-known multitouch trick to quickly delete multiple voicemails at the same time. This is probably the quickest way to clear out the entire voicemail inbox there is, and it’s really easy to do.


Delete Multiple Voicemails at Once with Multitouch


  1. Open the Voicemail portion of Phone app, then tap on “Edit”

  2. Use multiple touch points to tap on multiple red minus (-) delete buttons simultaneously, then concurrently tap on the red “Delete” buttons


Delete multiple voicemail messages on the iPhone with multitouch


Deleting voicemail from the iPhone also removes it from the voicemail server, at least with most cellular providers, thus you should only clear voicemails after you have listened to them and deemed them not worthy of keeping. That may sound obvious, but because of this trick to recover accidentally deleted voicemail messages that are still stored on the device (i.e.; hasn’t been rebooted yet), some users have been baffled to find that not all voicemail is recoverable that way.


In some situations, deleting all voice messages can function as a secondary approach to resolving the Visual Voicemail Unavailable error message, though you should manually check voicemail by calling your own number before doing this, otherwise you may end up losing it without ever hearing the recording.


Checking VoiceMail Storage Capacity Usage


The latest versions of iOS let you check the total capacity consumed by voicemail messages easily:


  1. Head to “Settings” on the iPhone, then go to “General” followed by “Usage”

  2. Navigate through the app list to find “Voicemail” and the storage consumed alongside it


Checking Voicemail storage usage on the iPhone


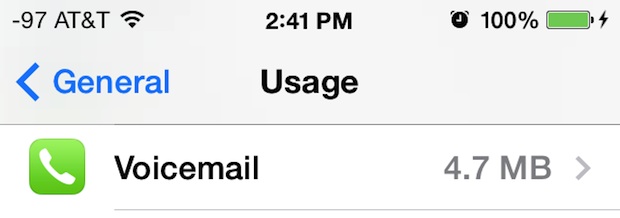
The Voicemail storage usage list isn’t actionable, but it will tell you exactly how much space you’ll get by deleting the messages stored on the phone by using the above tricks.


Prior versions of iOS used to bundle Voicemail data as part of the “Other” space that seemed to universally confuse everyone, but now with it separated it’s very easy to determine if you’ll gain any meaningful storage by trashing the local messages or not. In the screen shot example, 4.7MB is obviously quite small, but I’ve seen the Voicemail portion take up 800MB on an iPhone before, so it ultimately depends on how much voicemail you get and how often you tidy up.


Email this Delete Voicemails from the iPhone One at a Time or Multiple at Once to a Friend! Receive Articles like this one direct to your email box! Subscribe for free today!

How to Set a Firmware Password on a Mac with OS X Mavericks osxdailynews.blogspot.com

osxdailynews.blogspot.com ® How to Set a Firmware Password on a Mac with OS X Mavericks

Set a firmware password on a Mac


Mac users in higher security risk situations may wish to enable an optional firmware password on their machines,which offers an advanced level of protection. In short, a firmware password is a lower level layer of security that is set on the actual Mac logicboards firmware, rather than at the software layer like FileVault encryption or the standard login password. The result of setting an EFI password is that a Mac can not be booted from an external boot volume, single user mode, or target disk mode, and it also prevents resetting of PRAM and the ability to boot into Safe Mode, without logging in through the firmware password first. This effectively prevents a wide variety of methods that could potentially be used to compromise a Mac, and offers exceptional security for users who require such protection.


Important: Like any other essential password, use something memorable but complex, and do not forget a firmware password after it has been set. A lost firmware password is unrecoverable on most modern Macs without a visit to an Apple Store or sending a Mac into Apple Support for service and recovery. Older Mac models may be able to use a hardware intervention method to bypass firmware passwords, but these methods are not possible on new Macs without access to removable batteries or memory modules, thus the visit to Apple.


Setting a Firmware Password on a Mac


Setting a firmware password is rather simple, though it’s handled slightly differently in OS X Mavericks than it was in earlier versions of Mac OS X.


  1. Reboot the Mac, and hold down Command+R to boot directly into Recovery Mode

  2. At the OS X Utilities splash screen, pull down the “Utilities” menu bar and choose “Firmware Password Utility”

    Firmware Password Utility


  3. Choose “Turn On Firmware Password”

    Turn on the firmware password


  4. Enter the password twice to confirm, then choose “Set Password” to assign to assign that password to the Mac – do not forget this password or you may lose access to the Mac

    Set a firmware password


  5. Choose “Quit Firmware Password Utility” to set the EFI password


With the firmware password set, you can reboot the Mac as usual. For any standard boot or restart, the Mac will boot into OS X as usual, and go directly to the normal OS X login screen.


When / Where the Firmware Password is Visible


The firmware password will not appear during a regular restart or boot of the Mac, it only becomes mandatory when the Mac is attempted to boot from alternate methods. This may be in situations where a Mac is attempted to boot from an OS X installer drive, an external boot volume, Recovery Mode, Single User Mode, Verbose Mode, Target Disk Mode, resetting the PRAM, or any other alternative booting approach that will summon the rather plain looking firmware password window. There are no password hints or additional details provided, only a simple lock logo and a text entry screen.


a Mac firmware password


An incorrectly entered firmware password does nothing and offers no indication of login failure except that the Mac won’t boot as anticipated.


Note that all modern Intel-based Macs refer to firmware passwords as EFI (Extensible Firmware Interface) passwords, while older Macs referred to them as Open Firmware. The general concept remains the same, just different hardware.


Should You Use a Firmware Password on Your Mac?


Most Mac users will find a firmware password an unnecessarily heightened security precaution, and using this feature is best limited to Mac users in higher risk environments where having maximum security is a requirement. For the average Mac user, a standard boot login authentication and screen saver password is usually sufficient protection, while enabling FileVault disk encryption can offer additional security benefits to users who want their files and data protected from unauthorized access. FileVault can also be used as a means of preventing manual resetting of account passwords on Macs within higher security risk environments, but as several readers pointed out in the comments, the firmware protection should also be used in high security situations.


Email this How to Set a Firmware Password on a Mac with OS X Mavericks to a Friend! Receive Articles like this one direct to your email box! Subscribe for free today!

Minggu, 05 Januari 2014

Fix a Flickering Screen Issue with External Displays After Updating OS X osxdailynews.blogspot.com

Written By Unknown; About: Fix a Flickering Screen Issue with External Displays After Updating OS X osxdailynews.blogspot.com on Minggu, 05 Januari 2014

osxdailynews.blogspot.com ® Fix a Flickering Screen Issue with External Displays After Updating OS X

Fix a flickering not-working external screen problem with Macs


Having recently went through the process of updating a handful of Macs to OS X Mavericks as part of a gifting tech support campaign, several Macs developed an odd flickering display problem that was only visible when an external monitor was connected to the Mac. On an 11″ MacBook Air, the screen flickers with any DVI or VGA display hooked up with the standard Min-iDisplayPort adapter, and displays only a white-black noise screen, like an ancient TV without an antenna. Meanwhile on a newer MacBook Pro, the problem exhibited as external display flickering with anything from DVI connections to HDMI, and with different brand monitors, but the screen would display properly just with a persistent randomized flicker. The video below demonstrates the MacBook Air flickering on and off with a noisy picture:


(Excuse the vertical video formatting, someone didn’t follow this important advice for recording with the iPhone camera!)


Because each of the Macs behaved perfectly normal with external displays prior to the OS X update, and the problem spans between two totally different Macs and with different connection types and even monitor brands, this suggests something went awry during the upgrade process. That’s good news, because that also means the problem was likely not to be simultaneous concurrent hardware failure – a truly rare event that would be even moreso with two unrelated machines failing side by side. Fortunately, a simple SMC reset resolved the problem completely on both Macs, and external displays again worked as they should post-SMC reset.


Resolve Monitor Flickers by Resetting the System Management Controller of a Mac


This is how you reset the SMC on a portable Mac that has a built-in battery (not a removable battery), like a MacBook Air, or new MacBook Pro with Retina display. You can find details for SMC resets on other Macs here, and Apple has directions for other machines here too.


  • Disconnect the external display from the Mac

  • Shut down the Mac so that it is turned OFF (not sleeping)

  • Connect the MagSafe power adapter to the MacBook

  • Using the built-in keyboard on the MacBook, press and hold down the Shift+Control+Option+Power buttons at the same time (see the image below for details) and hold them for about 2 seconds, then release all keys together


These are the keys to press and hold simultaneously on the MacBook Pro / Air keyboard to reset the SMC:


Reset the SMC of a MacBook Air or Retina MacBook Pro


When that is finished, boot the Mac and reconnect the display:


  • Now press the Power button on the keyboard to boot the Mac as usual

  • Wait until the Mac is booted and reconnect the external display


Everything should be working as usual, no more monitor screen flickering, no more noisy screen displays, just the Mac with a normal looking external display.


Beyond display issues, resetting the System Management Controller can also resolve many other problems related to power management and hardware, both that have occurred post system updates or seemingly at random. We’ve covered several other issues like this in the past, including a suddenly missing battery and fans blaring on portable Macs, inability to put a Mac into sleep mode, and fan noise and heat issues that have popped up after installing a system update. Because there is little harm in resetting the SMC beyond losing some simple Energy settings that you can reconfigure within System Preferences, it’s worth trying yourself before taking further steps to resolve hardware problems with any Mac, and it’s actually a common step recommended by Apple Genius staff through phone support, and even at the Genius Bar in an Apple Store.


If you or anyone you know happens to run into the screen flicker issue after an OS X update, try this SMC fix first, it only takes a moment and resolved the problem quickly in these cases, and just may work for you too.


Email this Fix a Flickering Screen Issue with External Displays After Updating OS X to a Friend! Receive Articles like this one direct to your email box! Subscribe for free today!

Sabtu, 04 Januari 2014

Fix a Flickering Screen Issue with External Displays After Updating OS X osxdailynews.blogspot.com

Written By Unknown; About: Fix a Flickering Screen Issue with External Displays After Updating OS X osxdailynews.blogspot.com on Sabtu, 04 Januari 2014

osxdailynews.blogspot.com ® Fix a Flickering Screen Issue with External Displays After Updating OS X

Fix a flickering not-working external screen problem with Macs


Having recently went through the process of updating a handful of Macs to OS X Mavericks as part of a gifting tech support campaign, several Macs developed an odd flickering display problem that was only visible when an external monitor was connected to the Mac. On an 11″ MacBook Air, the screen flickers with any DVI or VGA display hooked up with the standard Min-iDisplayPort adapter, and displays only a white-black noise screen, like an ancient TV without an antenna. Meanwhile on a newer MacBook Pro, the problem exhibited as external display flickering with anything from DVI connections to HDMI, and with different brand monitors, but the screen would display properly just with a persistent randomized flicker. The video below demonstrates the MacBook Air flickering on and off with a noisy picture:


(Excuse the vertical video formatting, someone didn’t follow this important advice for recording with the iPhone camera!)


Because each of the Macs behaved perfectly normal with external displays prior to the OS X update, and the problem spans between two totally different Macs and with different connection types and even monitor brands, this suggests something went awry during the upgrade process. That’s good news, because that also means the problem was likely not to be simultaneous concurrent hardware failure – a truly rare event that would be even moreso with two unrelated machines failing side by side. Fortunately, a simple SMC reset resolved the problem completely on both Macs, and external displays again worked as they should post-SMC reset.


Resolve Monitor Flickers by Resetting the System Management Controller of a Mac


This is how you reset the SMC on a portable Mac that has a built-in battery (not a removable battery), like a MacBook Air, or new MacBook Pro with Retina display. You can find details for SMC resets on other Macs here, and Apple has directions for other machines here too.


  • Disconnect the external display from the Mac

  • Shut down the Mac so that it is turned OFF (not sleeping)

  • Connect the MagSafe power adapter to the MacBook

  • Using the built-in keyboard on the MacBook, press and hold down the Shift+Control+Option+Power buttons at the same time (see the image below for details) and hold them for about 2 seconds, then release all keys together


These are the keys to press and hold simultaneously on the MacBook Pro / Air keyboard to reset the SMC:


Reset the SMC of a MacBook Air or Retina MacBook Pro


When that is finished, boot the Mac and reconnect the display:


  • Now press the Power button on the keyboard to boot the Mac as usual

  • Wait until the Mac is booted and reconnect the external display


Everything should be working as usual, no more monitor screen flickering, no more noisy screen displays, just the Mac with a normal looking external display.


Beyond display issues, resetting the System Management Controller can also resolve many other problems related to power management and hardware, both that have occurred post system updates or seemingly at random. We’ve covered several other issues like this in the past, including a suddenly missing battery and fans blaring on portable Macs, inability to put a Mac into sleep mode, and fan noise and heat issues that have popped up after installing a system update. Because there is little harm in resetting the SMC beyond losing some simple Energy settings that you can reconfigure within System Preferences, it’s worth trying yourself before taking further steps to resolve hardware problems with any Mac, and it’s actually a common step recommended by Apple Genius staff through phone support, and even at the Genius Bar in an Apple Store.


If you or anyone you know happens to run into the screen flicker issue after an OS X update, try this SMC fix first, it only takes a moment and resolved the problem quickly in these cases, and just may work for you too.


Email this Fix a Flickering Screen Issue with External Displays After Updating OS X to a Friend! Receive Articles like this one direct to your email box! Subscribe for free today!

Fix a Flickering Screen Issue with External Displays After an OS X Update osxdailynews.blogspot.com

osxdailynews.blogspot.com ® Fix a Flickering Screen Issue with External Displays After an OS X Update

Fix a flickering not-working external screen problem with Macs


Having recently went through the process of updating a handful of Macs to OS X Mavericks as part of a gifting tech support campaign, several Macs developed an odd flickering display problem that was only visible when an external monitor was connected to the Mac. On an 11″ MacBook Air, the screen flickers with any DVI or VGA display hooked up with the standard Min-iDisplayPort adapter, and displays only a white-black noise screen, like an ancient TV without an antenna. Meanwhile on a newer MacBook Pro, the problem exhibited as external display flickering with anything from DVI connections to HDMI, and with different brand monitors, but the screen would display properly just with a persistent randomized flicker. The video below demonstrates the MacBook Air flickering on and off with a noisy picture:


(Excuse the vertical video formatting, someone didn’t follow this important advice for recording with the iPhone camera!)


Because each of the Macs behaved perfectly normal with external displays prior to the OS X update, and the problem spans between two totally different Macs and with different connection types and even monitor brands, this suggests something went awry during the upgrade process. That’s good news, because that also means the problem was likely not to be simultaneous concurrent hardware failure – a truly rare event that would be even moreso with two unrelated machines failing side by side. Fortunately, a simple SMC reset resolved the problem completely on both Macs, and external displays again worked as they should post-SMC reset.


Resolve Monitor Flickers by Resetting the System Management Controller of a Mac


This is how you reset the SMC on a portable Mac that has a built-in battery (not a removable battery), like a MacBook Air, or new MacBook Pro with Retina display. You can find details for SMC resets on other Macs here, and Apple has directions for other machines here too.


  • Disconnect the external display from the Mac

  • Shut down the Mac so that it is turned OFF (not sleeping)

  • Connect the MagSafe power adapter to the MacBook

  • Using the built-in keyboard on the MacBook, press and hold down the Shift+Control+Option+Power buttons at the same time (see the image below for details) and hold them for about 2 seconds, then release all keys together


These are the keys to press and hold simultaneously on the MacBook Pro / Air keyboard to reset the SMC:


Reset the SMC of a MacBook Air or Retina MacBook Pro


When that is finished, boot the Mac and reconnect the display:


  • Now press the Power button on the keyboard to boot the Mac as usual

  • Wait until the Mac is booted and reconnect the external display


Everything should be working as usual, no more monitor screen flickering, no more noisy screen displays, just the Mac with a normal looking external display.


Beyond display issues, resetting the System Management Controller can also resolve many other problems related to power management and hardware, both that have occurred post system updates or seemingly at random. We’ve covered several other issues like this in the past, including a suddenly missing battery and fans blaring on portable Macs, inability to put a Mac into sleep mode, and fan noise and heat issues that have popped up after installing a system update. Because there is little harm in resetting the SMC beyond losing some simple Energy settings that you can reconfigure within System Preferences, it’s worth trying yourself before taking further steps to resolve hardware problems with any Mac, and it’s actually a common step recommended by Apple Genius staff through phone support, and even at the Genius Bar in an Apple Store.


If you or anyone you know happens to run into the screen flicker issue after an OS X update, try this SMC fix first, it only takes a moment and resolved the problem quickly in these cases, and just may work for you too.


Email this Fix a Flickering Screen Issue with External Displays After an OS X Update to a Friend! Receive Articles like this one direct to your email box! Subscribe for free today!