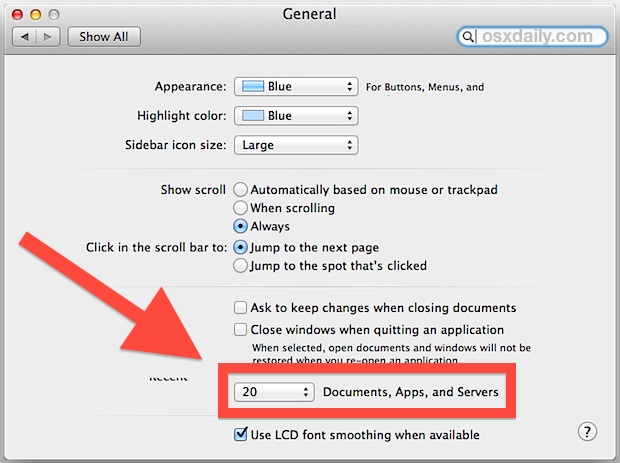
The File menu in just about every file-centric application throughout OS X has an “Open Recent” option, which displays the 10 most recent files that have been used in that given Mac app. While 10 recent documents is a fair amount, many of us prefer to have more recent files visible in those Recent Files menus, and that’s what we’ll show how to adjust with a simple settings change. Users will have options to set the recent document list to: none, 5, 10, 15, 20, 30, or a whopping 50 recently used files, though
- Go to the Apple menu and open System Preferences
- Choose the “General” panel
- Look for the “Number of Recent Items” option near the bottom – this is often erroneously displayed in Mavericks (a bug, presumably) so just look for the number submenu next to “Documents, Apps, and Servers”
- Pull down the submenu and choose the number of recent files you wish to display in the “Open Recent” menu
- Close out of System Preferences, and then quit and relaunch the app(s) to see the change
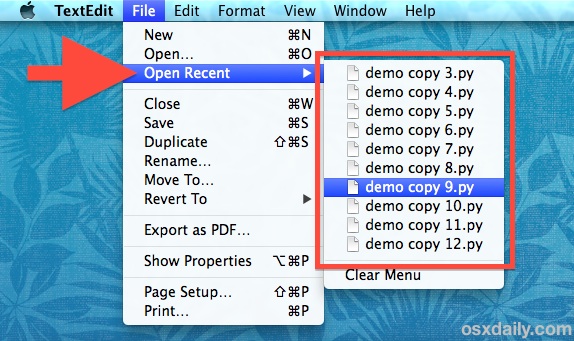
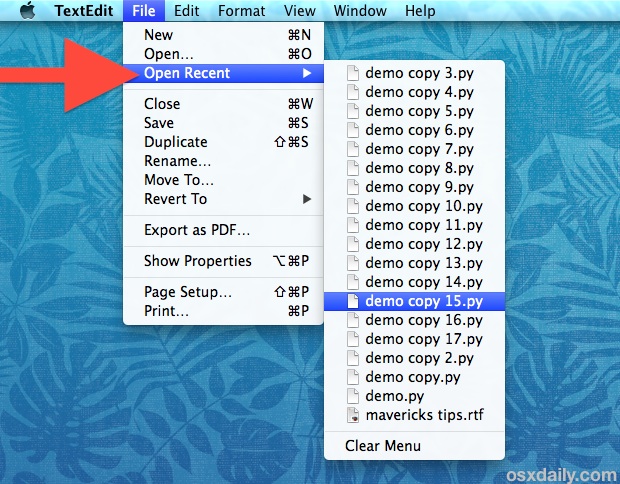
Using the TextEdit app as an example, making this change to show 20 recent items reveals many more options in the “Open Recent” menu.
It’s important to note that making the change to “Open Recent” menu also directly changes the “Recent Items” submenu visible in the Apple menu… why an application-level control is directly correlated to a system-level item is a little peculiar, as it would likely make more sense for them to be separate – something that may be possible with a ‘defaults write’ command (any ideas? let us know!). On the positive side of these settings being directly related, it could be easier to see files that may have been opened without user consent by increasing the number of visible items overall.
Note for those wanting to return to the default opting this setting in all versions of OS X is set to ’10′ recent items.
This trick works the same with just about every version of Mac OS X, though some changes were made to OS X Mavericks which removes some specificity. Prior to Mavericks, users were able to adjust the number of recent items on a very specific basis, setting a unique number for Applications, Documents, and Servers. Now, there is only one option that covers all of them, which carries into the Apple menu as well.
For those who don’t use the Recents items lists because they are tucked within a menu, you can also enable a hidden Recent Items list in the Dock of OS X by using a defaults command.
Thanks to @sambowne on Twitter for the tip idea, don’t forget to follow us there too.
Email this Change the Number of Files Shown in “Open Recent” Menu Items of OS X to a Friend! Receive Articles like this one direct to your email box! Subscribe for free today!
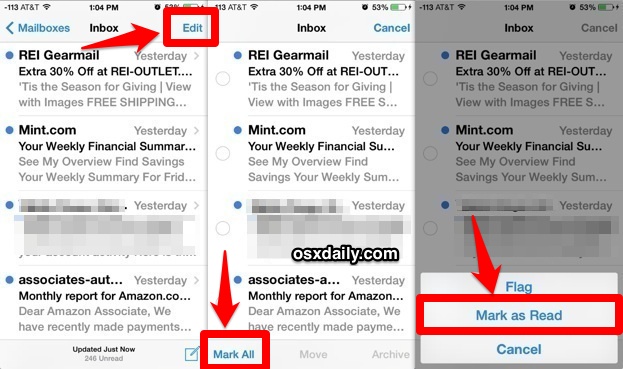
 Mail app on the iPhone and iPad received a major revamp along with iOS 7 that includes a variety of improvements and adjustments, but out of all the new features, some of the simplest changes are perhaps the most welcome. Case in point; a new and much faster way to easily mark all emails in Mail app as read. Yes, you read that right, you can now almost instantly mark all email as read on the iPhone, without having to use any quirky tricks or workarounds to complete the task. Amazingly, this simple option took until iOS 7.0 for users to get, but now the process is very direct and extremely quick: