
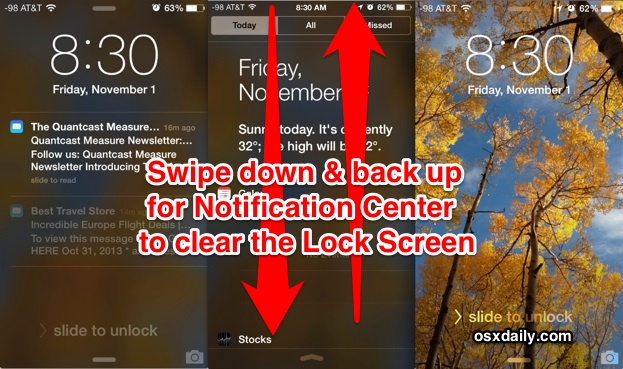
Have a bunch of Notifications and Alerts sitting on the lock screen of your iPhone or iPad that you don’t want on there anymore, but don’t want to unlock the device or leave the lock screen? No sweat, rather than swiping to unlock the iOS device and then manually addressing the notifications, you can shuffle them all away and store them into Notification Center where they belong, immediately clearing off the lock screen without ever leaving it. This swipe gesture trick is similar to how you can dismiss alerts from anywhere, and it’s super easy to use:
- Swipe down from the top of the Lock Screen to summon Notification Center
- Swipe back up to dismiss Notification Center and collect all the alerts and notifications
Done, you now have a clear iOS lock screen again.
This is a great trick to use if you don’t want to go all out to hide the notifications or disable the lock screen alerts. It’s also helpful if you get a notification you don’t want others to see, because you can quickly swipe up and down to collect it back into notification center. This works for every type of alert or notification residing on the iOS 7 (or newer) lock screen, though you’ll obviously need to have lock screen access of Notifications and Notification Center enabled in the settings to be able to use it. Don’t forget to customize “Today View” as well, it’s the first screen you see when accessing the panel and you can tune it to fit the needs of what you want to see.
This great little trick comes to us from CultOfMac, who mentions they had to tap the “Missed” tab to get it to work, though in testing just a super quick swipe down and up worked fine to get the job done.
Email this Quickly Clear Notifications from the Lock Screen in iOS to a Friend! Receive Articles like this one direct to your email box! Subscribe for free today!
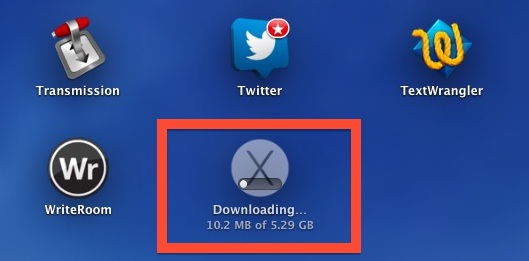
 Already installed OS X Mavericks, but now you want to create an install drive for other computers? Or maybe the Mavericks installer became corrupt during the process? Whatever the situation, you can easily re-download OS X Mavericks from the Mac App Store.
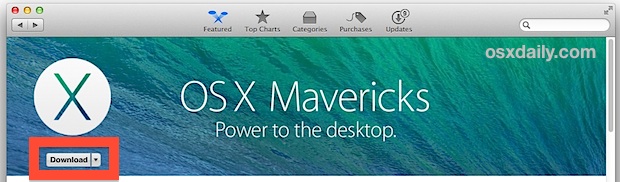


 Java has plenty of real-world applications and uses, but because it has been used as an attack vector in the past, Apple has made OS X reasonably aggressive in limiting Java on Macs. As a result, Mavericks does not come with Java preinstalled, and upgraded Macs will remove Java in Mavericks installation process. For most users this is a very good thing, it further reduces the unlikely event of a trojan or something nefarious being installed on Macs, and many Mac users won’t notice Java missing at all. On the other hand, many of us do need Java installed in OS X.
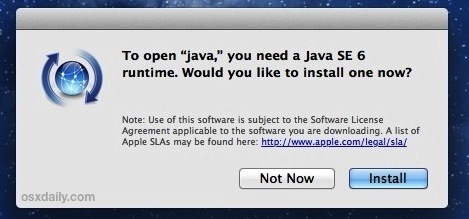
 Network Utility is a great tool that has been around on the Mac since the very first version of OS X. It provides a variety of helpful networking tools and details, the “Info” tab includes general network info on a per interface level showingIP address, MAC address, link speeds, and sent/received data transfer statistics, and you’ll also have easy GUI access to what are otherwise command line tools, like netstat, ping, nslookup, trace route, whois, finger, and a port scanner.


 App Nap is a great feature that arrived with OS X Mavericks which automatically pauses applications once they have gone unused for a period of time, helping to reduce energy consumption and saving battery life for portable Macs. Though App Nap can make a big difference in extending the battery life of MacBooks, there are some unique situations where users may not want an application to pause itself when unused, inactive, or otherwise in the background. For these situations, you can selectively prevent App Nap by disabling it on a per-application basis. Most users should not disable App Nap without a compelling reason to do so.


 All of the latest versions of OS X have opted for a conservative approach to showing the users ~/Library/ directory, a folder which contains a variety of important files, settings, preferences, caches, and many specific files that are required for apps to run as intended. Because of the possibility of unintentional harm to a users Mac, OS X defaults to hiding that folder, with the intention on preventing novice users from making changes to it. OS X Mavericks is no different, but with the release of 10.9, all Mac users have an easy option to permanently show the User Library directory without having to result to the command line or other tricks that were previously required for access to the ~/Library folder.

